Sending files through Apache with mod_xsendfile

If you ever wanted to serve big or many files through PHP and needed to check permissions or do any other calculation upfront file delivery, you might want to think about an Apache module called mod_xsendfile. With it you’re able to separate permission checks and other script related stuff from the slow part of file delivery in which PHP is not best at.

And getting it up and running is pretty simple.

a2enmod xsendfile
apache2ctl restart

Now, in your virtual host configure your host to pick up the module and maybe define a folder wich the module is allowed to send files from.

#enable the module for your host
XSendFile On

#define a white list folder outside your DocumentRoot
XSendFilePath /some/path/outside/my/docroot

That’s it on the Apache side of things.
Now, simply tell Apache to handle the file transfer itself in your script. This is done by sending the X-Sendfile-Header. No more needs to be done. No file reading, nothing. The whole delivery is being delegated to Apache.

//some code to check permissions, get the file name, rescue the world or whatever
//...
header('X-Sendfile: '.$absolute_path_to_file);
header ('Content-Type: application/octet-stream');
header ('Content-Disposition: attachment; filename='.$some_file_name );
exit();

And that’s it. Now all your validation stuff will be done by PHP while file delivery is done by Apache.

Gedittools – a new version

First of all: Thanks to all folks using my Gedittools plug-in for Gedit! All the mails and comments and download stats show that I was not the only guy looking for missing functionality in Gedit. During the past week or so I found some time to improve the XML-highlighting mechanism for Gedittool:

In fact, I re-designed and implemented the algorithm to find and highlight XML-tags from scratch. It is now much faster in searching and highlighting.

All other features like

– counting search results
– highlighting marked words throughout the document
– integrating a meld-interface to compare / diff opened files

remain as they are. Feel free to download the plug-in at Github.

Gedittools - a plug-in for gedit

Citrix Client on Ubuntu 10, 64 Bit.

Unfortunately, there is no 64 Bit package for the Citrix client 11. So, it is a smaller challange to install the client using 32 bit libraries. There are a couple of nice tutorials on the net. The one which helped me most was the how to by I can has linux. Basically it describes, that one should download the current 32 Bit Linux client from the Citrix Download Page. After running the basic installation you’ll need to download the Motif 32Bit Libraries, extract its files using ar and copy its libs to /usr/lib32 on your Ubuntu system.

But I still had a few issues installing the client: A symbolic link called libXm.so.4 was missing in the first place. To fix that, I did the following:

cd /usr/lib32
sudo ln -s libXm.so.3.0.2 libXm.so.4

Now, I was able to start the client: /usr/lib/ICAClient/wfcmgr

Trouble connecting via SSL

But when I tried to connect to a SSL Host, the connection broke telling me that To fix this, 2 steps are required. Download the certification files. Now, move the files to /usr/lib/ICAClient/keystore/cacerts or whatever the installation directory of your client installation is.

After that, Citrix client and connecting SSL hosts worked like a charm.

Gedittools – a plug-in for gedit.

Update September 21: The XML Highlighting algorithm has been re-implemented. Therefore, this feature is now much faster than before. Also, it is not triggered automatically. There is a new button in the toolbar to start XML highlighting.

During the past few weeks I extended gedit by several little plug-ins that I needed to have for my daily developer work. Now, I merged all those to one single configurable plug-in called gedittools.

It comes along with the following features:

  • XML highlighting: After hitting the highlighting button in the tool bar, the complete tree inside the file will be highlighted. Depending on depth different colors will be used.
  • Selection highlighting: After a double click on any word, all occurrances of the selected word will be highlighted throughout the whole current document.
  • Search selection count: After a double click on any word, all occurrances of the selected word will be counted and the sum will be displayed in the status bar of the document.
  • Launch meld to compare files: A button is added to the toolbar of gedit to allow launching meld. Therefore a screen will be displayed: It allows selection of a file which will be compared to the current active file in gedit.

The plug-in is configurable: You can choose which plug-in you want to use. To make use of the meld launcher feature, an installation of meld is required. Refer to the README file for details.

Download here

If you want to use the plug-in, feel free to download it at github: http://github.com/mmuell23/mmuell23

To install from git:

git clone http://github.com/mmuell23/mmuell23.git
cp -r mmuell23/gedittools/* ~/.gnome2/gedit/plugins

Activate plug-in in gedit preferences and configure it as you wish.

Install from zip File:

You might also download the plug-in as a zip file from github. Hit the “download source” button on the top right of the site.

Extract all files and copy to ~/.gnome2/gedit/plugins

Activate plug-in in gedit preferences and configure it as you wish.

Plug-ins for gedit: count results or compare files.

Well, after I could count words in a gedit document based on a selection I made, I decided to add another missing feature:

I needed a diff tool to compare two files that are currently opened in gedit. Unfortunately, gedit doesn’t come along with these kind of features. So, another plug-in was needed.

Meldlauncher

What it does? It simply starts the open source diff & merge tool Meld using two documents opened in gedit. That’s why I called it meldlauncher. Therefore, if you want to use meldlauncher, you will need to have Meld installed. On Ubuntu do something like this:

sudo apt-get install meld

If there are only two documents opened in gedit, meldlauncher will launch Meld and pass those two files to it. If there are more than two documents opened, meldlauncher will open a selection dialog from which you can easily choose the document to compare the current document with.

I moved both the counter plug-in and the meldlauncher plug-in to Github. Feel free to grab it from there:

http://github.com/mmuell23/mmuell23

Count search results in gedit.

Update September 21:
After all, I found some time to reimplement the algorithm for highlighting XML. It is now triggered by a new button in the toolbar. As it now does not run automatically, this will be another improvement to overall speed. Feel free to download the new version at the provided download link below or at github!

Update May 5:
Count results are now being displayed in the Status Bar instead of an alert window. Also, there were a couple of bug fixes. Feel free to download the new version at the provided download link below or at github!

Lately I was looking for a small but missing feature in gedit: I needed to be able to count all occurrances of a selected word. This is a standard feature in many other editors such as Notepad++ in the Windows world, for example. However, I didn’t come across a solution on the net, so I decided to write a little plug-in myself.

What it does: After marking a word the plug-in counts all occurrances of the selection in the current document. It adds a new button to the toolbar and an entry to the menu right in the “Search” section. On top of that you may trigger counting the selection by hitting “CTRL+SHIFT+F”. A small pop-up window will appear and show the results of the search. The results will be displayed in the status bar of the window.

How to use it: Simply mark a word, and have a look at the statusbar: The number of search results will be displayed there.

If you find it useful, feel free to download the plug-in here:

Donwload at github:
http://github.com/mmuell23/mmuell23

git clone http://github.com/mmuell23/mmuell23.git
cp -r mmuell23/gedittools/* ~/.gnome2/gedit/plugins

Ubuntu und Abhängigkeiten

Heute Morgen installierte ich das neue Ubuntu 10.04 Beta in einer Virtuellen Maschine.

Funktionierte wunderbar, bis auf die Tatsache, dass sich die Maschine bei der Installation der MySQL Gui Tools wohl ein wenig verschluckte. Jedenfalls installierte sich das Paket mit seinen “Kindern” mysql-query-browser und mysql-admin nicht korrekt.

Deinstallieren und neu installieren ließ es sich auch nicht. Es brach mit folgendem Fehler ab:

Entferne mysql-admin ...
dpkg (Unterprozess): kann installiertes post-removal-Skript nicht ausführen: Exec format error
dkpg: Fehler beim Bearbeiten von mysql-admin (--remove):
Unterprozess installiertes post-removal-Skript gab den Fehlerwert 2 zurück

Was tun? Viele Forenbeiträge liefen ins Leere und ich fand keinen Weg, die korrupten Pakte manuell zu löschen.

Die Lösung für dieses Problem war aber sehr leicht:

Es existieren im Verzeichnis /var/lib/dpkg/info Dateien mit Informationen zu allen installierten Pakten. Hier habe ich einfach alle Dateien rausgesucht, die für meine gesuchten MySQL Pakete relevant waren und sie aus dem Verzeichnis verschoben. Mit

apt-get remove mysql-admin mysql-query-browser

verschwanden dann auch alle Fehlermeldungen und Abhängigkeiten und ich konnte über

apt-get install mysql-query-browser mysql-admin

die Pakte sauber neu installieren.

Evolution und Exchange

Da nun endlich meine Entwicklermaschine eine Linux-Maschine wird (einen Mac gabs leider nicht…), musste ich Evolution dazu bringen, mit dem Firmeneigenen Exchange Server zu kommunizieren. Nach ein wenig Frickelei und Überraschungsmomenten, klappt es nun.

Und so gehts:

1. Ein Exchange Konto erstellen in Evolution

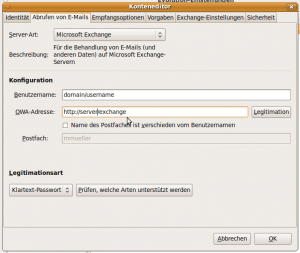
Zu allererst muss ein Exchange Account in Evolution (in meinem Fall in Version 2.2.8) erstellt werden. Für diesen sind folgende Einstellungen wichtig:

Domain und Username müssen, genau wie Server, durch die jeweiligen persönlichen Daten ersetzt werden und schon klappt der Zugriff auf die Emails. Wenn man den Server- oder Username nicht kennt, wird man in den Kontoeinstellungen von Outlook schnell fündig und kann die Einstellungen übernehmen.

2. Zugriff auf das Adressbuch im Active Directory

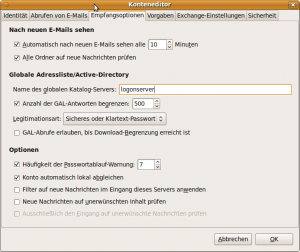
Für den Zugriff auf das globale Adressbuch im Active Directory muss eine weitere Einstellung getätigt werden. Dazu trägt man den Server, an welchem man sich angemeldet hat, im folgenden Screen als Setting ein. Herausfinden kann man diesen unter Windows in einer Eingabeaufforderung mit

echo %LOGONSERVER%

3. Zugriff auf Kalender anderer Nutzer

Um auf freigegebene Kalender anderer Nutzer zugreifen zu können, wechselt man in die Kalenderansicht und wählt Datei -> Kalender eines anderen Nutzers abonnieren

Es öffnet sich ein Screen, in welchem man aus dem globalen Adressbuch einen User suchen kann. Als default Ordnername steht “Calendar” in der Auswahlbox des zu abonnierenden Ordners. Das hat mir etwas Kopfzerbrechen bereitet, weil es schlicht nicht funktionieren wollte: Immer brach der Vorgang mit einer “Zugriff ist nicht erlaubt” Meldung ab. Je nach lokaler Installation des Exchange Servers scheint dieses Setting also nicht immer zu stimmen. In meinem Fall hat das Ersetzen durch das deutsche Wort “Kalender” den Effekt gebracht, dass ich auf freigegebene Kalender zugreifen konnte. Das englische “Calendar” blieb leider erfolglos.

4. Zugriff auf öffentliche Ordner

Einfacher verhält es sich mit den öffentlichen Ordnern. Diese können sehr einfach in der Email-Ansicht unter Ordner -> Abonnements verwaltet werden und erscheinen dann in der Liste der verfügbaren Email-Ordner. Hier können auch öffentliche Kalender abonniert werden, welche dann automatisch im Kalender erscheinen.

Nach diesen vier einfachen Schritten steht mir Evolution nun als nahezu vollwertiger Outlookersatz zur Verfügung.

Dell, Ubuntu und Skype.

Skype und Linux ist so eine Sache: Nachdem seit einigen Releases nun auch Video verfügbar ist, gibt es immer wieder Probleme mit dem Pulseaudio Sound Server. Zumindest auf meinem Dell Studio 1537 Notebook. Bald gibts nen Mac. Baaald….

Bis dahin: Mein Kampf mit Pulse ging heute in eine zweite Runde. Ubuntu 9.10 wollte nach einem Upgrade von 9.04 mein Mikrophon nicht mehr. Dass mein internes Mikrophon nicht geht mit Pulse, hab ich fast schon geschluckt. Aber mein externes hätte ich schon gerne. Diesmal habe ich mit (technischem) K.O. gewonnen. Technisch deshalb, weil immerhin mein externes Mikrophon nun wieder funktioniert, das interne aber immernoch nicht. Nun ja, sei es drum. Vielleicht hat einer von Euch ja die Lösung.

Hier nun die minimale Einstellung, die man treffen muss, um das Mikrophone zum Laufen zu bringen.

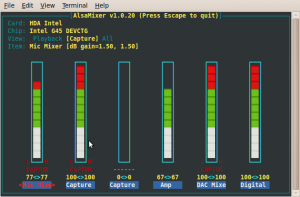
In einer Konsole den alsamixer starten.

alsamixer

Kurz noch “F4” gedrückt, um in die Capture Einstellungen zu gelangen. Was bei mir gefehlt hat, war die Einstellung “Capture” im Mic Mixer. Diese lässt sich mit Space toggeln. Selbiges muss für eine (oder beide) der Capture Items gemacht werden und schon klappts auch mit Skype.

alsamixer

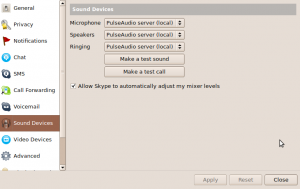
Skype selbst muss sowohl für die Einstellungen des Microphone als auch Speakers auf PulseAudio gestellt sein. Schnell noch ein Testanruf zur netten Dame von Skype und, juhu, es geht.

screenshot-options

Creating PDFs under Wine.

This morning I needed to create a PDF file under wine on my Ubuntu machine. Nothing easier than that: You will need to install cups-pdf.

sudo apt-get install cups-pdf

This will automatically install a “virtual” printer which is selectable in the print dialog of all windows applications installed under wine. After printing, the PDF may be found in a folder PDF directly under your home directory.